👉 Let’s stay connected on social media!
Easy Cookie Butter Cheesecake Cups for a Quick, Indulgent Dessert

QUICK REMINDER:
There’s a “jump to recipe” button for convenience, but if you head straight to the recipe card, you might miss useful ingredient notes, step-by-step tips, FAQs, and other helpful details that can make your dish turn out even better.
There are few comforts as quietly effective as a small, simple dessert that feels like you took time, when really you did not. I remember making these for a Sunday potluck when everything else on the table required foiling, basting, or ten steps of pretense. People drifted over, spooned into cups, and the conversation loosened. That is what these Cookie Butter Cheesecake Cups do best, they settle a table, and they are kind to the person doing the cooking.
Make them when you want something that tastes a little indulgent, but that you can trust not to fall apart. The base problem this recipe solves is the usual cheesecake anxiety, you know, the fear of cracks, slow baking, and watching the timer like a hawk. Here, instead of a whole cake and a water bath, you get individual cups that come together quickly and chill into a dense, creamy bite. If you want the full recipe page with tips and photos, there is a friendly version waiting at cookie butter cheesecake cups, but read on for the practical, weeknight-minded version.
Key ingredients for cookie butter cheesecake
- 1 cup crushed cookies (like graham crackers or chocolate cookies)
- 1/4 cup melted butter
- 8 oz cream cheese, softened,
- 1/2 cup cookie butter
- 1/2 cup powdered sugar
- 1 cup whipped cream
- 1 tsp vanilla extract

How it comes together, simply and without fuss
- In a bowl, mix the crushed cookies with melted butter until combined.
- Press the mixture into the bottom of serving cups to form a crust.
- In another bowl, beat the cream cheese and cookie butter until smooth.
- Gradually add powdered sugar and vanilla, mixing until well combined.
- Gently fold in the whipped cream until the mixture is light and fluffy.
- Layer the cheesecake filling over the cookie crust in each cup.
- Refrigerate for at least 1 hour before serving.
- Optionally, top with extra cookie butter or whipped cream before serving.
Textures and small checkpoints to watch for
The crust should hold together when you press it into the cup, but it should not be oily, that means your cookie crumbs were fine and the butter measured right. When you beat the cream cheese with the cookie butter, scrape the sides of the bowl occasionally so there are no little lumps hiding, and you should end up with a glossy, slightly elastic texture. Folding in whipped cream is a gentle, patient step, not a beating contest, you want streaks to disappear without deflating the mixture. If the filling looks slightly pillowy, that is good, it will set firmer in the fridge but keep a tender mouthfeel.
Small but genuine tricks that save time and stress
- Soften cream cheese by leaving it at room temperature for about 30 minutes, or microwave it in 5 second bursts, testing after each one, until spreadable.
- Use a small jar or cup to press the crust down, it keeps fingers cleaner and gives an even base.
- If your cookie butter is especially thick, warm it briefly in a bowl over hot water, stir, then add to the cream cheese, it blends more smoothly. A quick variation I often bring to neighborhood gatherings swaps chocolate cookie crumbs for the crust, it makes a prettier contrast and people lean in. If you’re curious about a different cookie-cheesecake idea that travels well, I like how a riff plays out in blueberry cheesecake cookies, which is a nice cousin to this dessert.
When you should make them, and how far ahead is okay
These are wonderful the day you serve them, but they are also forgiving to make the day before. If you make them overnight, cover them tightly so the crust doesn’t absorb too much moisture from the filling, and take them out of the fridge 15 to 20 minutes before serving so the flavor opens up. Transporting: keep them on a flat tray so cups don’t tip, and pack ice packs around the tray if you have more than an hour of travel. For morning prep on a busy day, this is a great make-ahead option, and if you need inspiration for a brunch-ish pancake-forward menu that pairs nicely, try thinking along the same lines as my blueberry buttermilk pancake casserole ideas, they live in the same practical, unfussy family.
FAQ: what everyone asks
You can use chocolate cookies if you prefer a richer base, just note the flavor will be bolder and the cups look darker, which some people love.
If you don’t have whipped cream on hand, stabilized whipped cream or whipped topping works, but fresh whipped cream gives the lightest texture and cleanest flavor.
To keep things from getting too sweet, taste as you go, especially if your cookie butter is sugary. You can reduce the powdered sugar slightly, but do not skip it entirely, it helps the filling set and balances texture.
If the filling is too loose, chill it longer, and be sure your whipped cream was firm when folded in. If the crust falls apart, press it more firmly or increase crumbs a touch next time.
Yes, these freeze okay for a couple of weeks, wrapped well. Thaw in the fridge overnight and loosen up at room temperature for a few minutes before serving so the texture is pleasant rather than icy.
A note before you go, and a small encouragement
These cups are not a showpiece, they are a little relief. They are the kind of dessert you bring when you want someone to have a good bite without your evening turning into a production. They hold up well to improvisation, and if something goes a bit sideways, a dollop of extra whipped cream or a scatter of crushed cookies on top will always make it feel intentional. Make them when you want a calm finish to dinner, and keep the recipe in your head for when you need a dependable crowd pleaser.
Print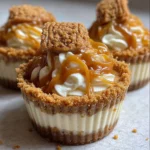
Cookie Butter Cheesecake Cups
- Total Time: 75 minutes
- Yield: 4 servings 1x
- Diet: Vegetarian
Description
Indulgent and simple dessert cups filled with creamy cheesecake and a cookie crust, perfect for gatherings.
Ingredients
Scale
- 1 cup crushed cookies (like graham crackers or chocolate cookies)
- 1/4 cup melted butter
- 8 oz cream cheese, softened
- 1/2 cup cookie butter
- 1/2 cup powdered sugar
- 1 cup whipped cream
- 1 tsp vanilla extract
Instructions
- In a bowl, mix the crushed cookies with melted butter until combined.
- Press the mixture into the bottom of serving cups to form a crust.
- In another bowl, beat the cream cheese and cookie butter until smooth.
- Gradually add powdered sugar and vanilla, mixing until well combined.
- Gently fold in the whipped cream until the mixture is light and fluffy.
- Layer the cheesecake filling over the cookie crust in each cup.
- Refrigerate for at least 1 hour before serving.
- Optionally, top with extra cookie butter or whipped cream before serving.
Notes
These cups are best served the day they are made but can also be prepared the day before. Store covered tightly in the fridge.
- Prep Time: 15 minutes
- Cook Time: 0 minutes
- Category: Dessert
- Method: Chilling
- Cuisine: American
Nutrition
- Serving Size: 1 cup
- Calories: 300
- Sugar: 20g
- Sodium: 150mg
- Fat: 20g
- Saturated Fat: 10g
- Unsaturated Fat: 8g
- Trans Fat: 0g
- Carbohydrates: 30g
- Fiber: 1g
- Protein: 4g
- Cholesterol: 30mg